

12 Factor App in NodeJS Part 1 (1-4)
I. Codebase, II. Dependencies, III. Config, IV. Backing Services


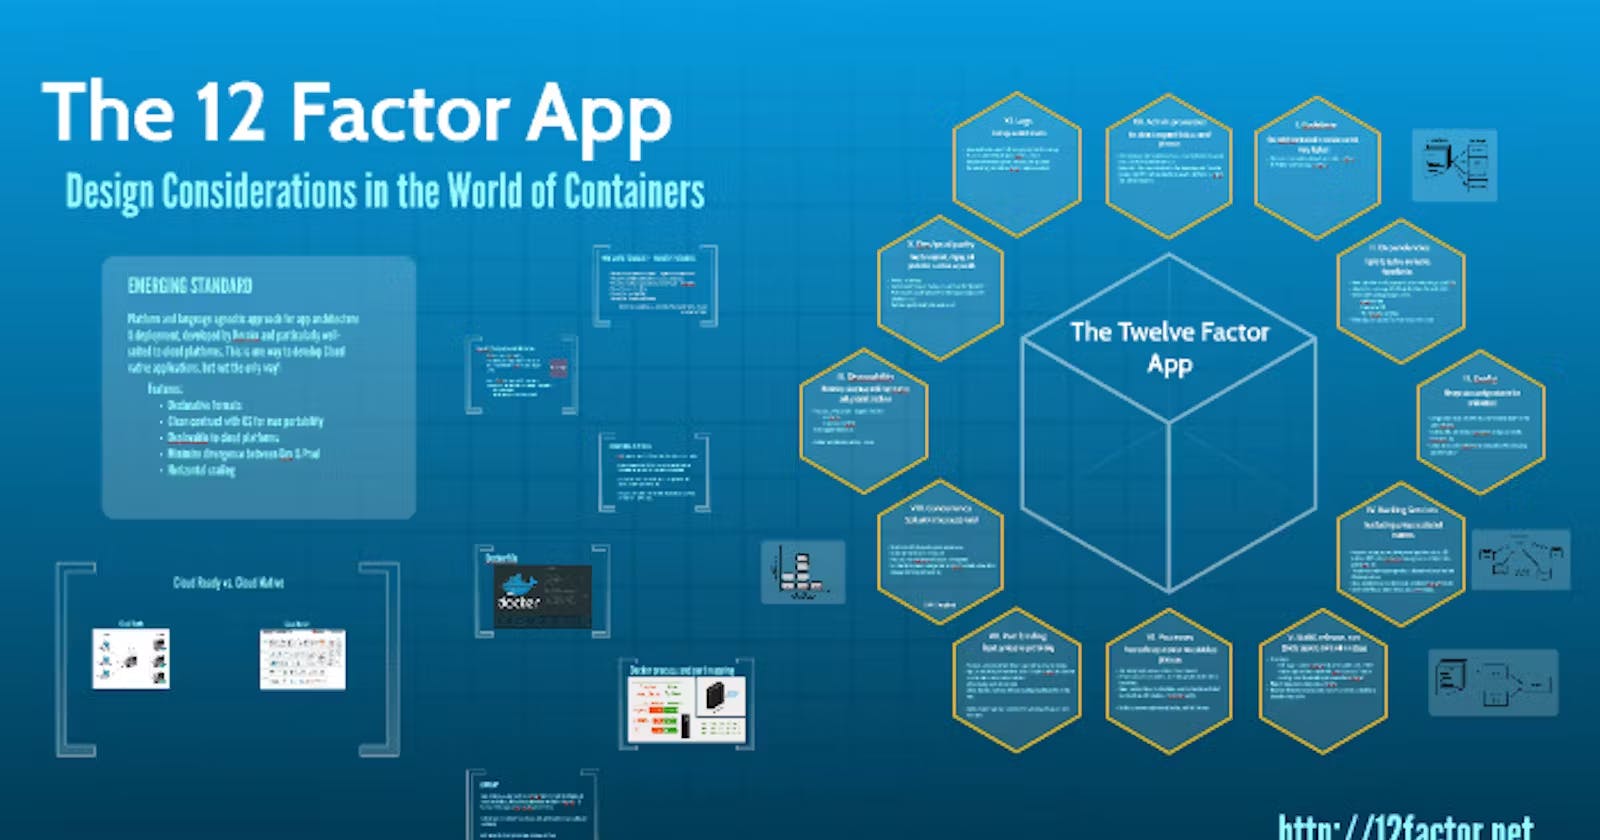
In Part 0, we got an overview of the 12-factor app methodology and its importance in building a scalable and reliable backend. In this Part, we will learn in detail about the first 4 factors and simultaneously implement them by building a blogging platform using NodeJS
1. Codebase
Nowadays, everyone is familiar with version control system aka VCS, such as Git, Mercurial, or Subversion, Git being the most popular one. It has become second nature to us that the first thing we do after initializing our project is run git init && git add . && git commit -m "Initial commit". To understand how important VCS is let's assume we don't know about VCS or something like VCS doesn't even exist.
Let's take 4 scenarios to understand how difficulty escalates exponentially
Working Solo on a Project with Single Deployment
Working Solo on a Project with Multiple Versions and Deployments
Working in a Team of 4 with a Single Version and Deployment
Working in a Team of 4 with Multiple Versions and Deployments
Here, deployment means version of the codebase. Single Deployment means only one version of the codebase that will be deployed. Multiple Deployments means multiple versions(including client-specific) of the codebase in multiple environments(staging, UAT, production)
Scenario 1: Working Solo on a Project with Single Deployment
As a solo developer without version control, working on a project with a single deployment becomes a risky situation. Any code changes made are irreversible, and there's no safety net in case of errors. If a bug is introduced, there's no straightforward way to revert to a previous, stable state. The lack of versioning makes it challenging to track changes over time, and it's easy to lose sight of the project's evolution.
Collaboration with past iterations is impossible, making it difficult to understand the reasoning behind certain decisions or to revisit successful implementations. The absence of branching and merging capabilities means that experimenting with new features or fixes could disrupt the entire codebase.
Deployments are a nerve-wracking process. If an issue arises during deployment, rolling back to a working state is a manual and error-prone task. Without a VCS, there are no efficient means of documenting the deployed versions or managing configurations for different environments.
Scenario 2: Working Solo on a Project with Multiple Versions and Deployments
In this scenario, the absence of version control worsens the challenges faced in the first scenario. Managing multiple versions and deployments without VCS becomes a logistical nightmare. Keeping track of different code states for various features or environments is practically impossible.
Each deployment is a high-stakes endeavor, as there is no systematic way to isolate changes specific to a version or deployment. Debugging becomes a herculean task, and the risk of introducing new bugs while fixing existing issues looms large. Without branching, trying out experimental features or implementing temporary fixes without affecting the main codebase becomes nearly impossible.
Documentation is limited to external notes or comments within the code, making it hard to understand the rationale behind specific versions or deployments. Coordinating changes across different branches or versions requires meticulous manual effort, leading to a high probability of errors.
Scenario 3: Working in a Team of 4 with Single Version and Deployment
Without version control in a team setting, collaboration turns chaotic. Coordinating efforts among team members becomes a communication-heavy process, relying on constant updates and manual file sharing. The risk of overwriting each other's work is ever-present, and resolving conflicts is an arduous manual task.
There's no clear history of changes, making it difficult to attribute modifications to specific team members, there will be blame games of faulty code as we won't be able to pinpoint who introduced the faulty code. Debugging and troubleshooting are cumbersome, as there's no easy way to identify when and why a particular change was made.
Deployment is a risky and unpredictable process, with no efficient rollback mechanism. Coordinating releases requires meticulous planning and synchronization among team members, increasing the likelihood of errors and downtime.
Scenario 4: Working in a Team of 4 with Multiple Versions and Deployments
In a team setting with multiple versions and deployments but without version control, the challenges escalate exponentially. Collaboration becomes a logistical nightmare, with each team member potentially working on a different version or deployment. Coordinating changes and ensuring a cohesive codebase is a constant struggle.
Without branching and merging capabilities, integrating features or fixes from different team members becomes an error-prone process. The risk of introducing conflicts and breaking the codebase during integration is high. Keeping track of changes across multiple branches or versions requires meticulous manual effort and is prone to oversight.
Deployments are high-stakes events, and rolling back to a stable state in case of issues is a manual and time-consuming task. The lack of versioning makes it challenging to manage configurations for different environments, leading to potential deployment errors.
It was just a Nightmare
To sum it up, without version control, it's like navigating a coding maze with a blindfold. Adding a version control system is like turning on the lights — suddenly, everything just clicks. I hope after reading this, your appreciation for VCS increases tenfold
Now that we know what it's like without VCS, let's create our project and initialize it with git. Our project will be a simple blog application that will be built using ExpressJS, Typescript and MySQL. We will name our project will be bloggo.
Let The Coding Begin
Create a Project folder with README.md
mkdir bloggo && cd bloggo && touch README.md && echo -e "# Bloggo \n\nSimple Blog Application" > README.md
Initialize Git Repo
git init && git add . && git commit -m "initial commit"
Link to commit for changes up to this section https://github.com/sumitbhanushali/bloggo/commit/a5f14218eab0fb5a84fdf1e31fe31965925e81d1
2. Dependencies
12 Factor app is easy to setup and run. This will be possible when all dependencies are declared in the dependency declaration manifest. These dependencies will be isolated i.e. these dependencies will only apply to the current app and no global or system-wide package will be accessible inside it unless it is explicitly declared in the dependency declaration manifest.
This reduces friction to setup projects on the developer's machine or even on production and leads to increased productivity and thus a better app will be delivered.
NodeJS has few popular package managers available like npm, pnpm and yarn. We will be using npm since it is the official package manager of NodeJS and most developers are already well-versed with it.
This generates a default package.json file which will be used by npm to store metadata, dependencies and scripts
npm init -y
We will use Express to create our app
npm i express
We don't want node_modules to be committed to git since it will unnecessarily increase our repo size which will make it longer to clone
echo "node_modules" > .gitignore
Our final package.json file will look like this
{
  "name": "bloggo",
  "version": "1.0.0",
  "description": "Simple Blog Application",
  "main": "index.js",
  "scripts": {
    "test": "echo \"Error: no test specified\" && exit 1"
  },
  "keywords": [],
  "author": "",
  "license": "ISC",
  "dependencies": {
    "express": "^4.18.2"
  }
}
Link to commit for changes in this post https://github.com/sumitbhanushali/bloggo/commit/a91c1424aa8a7279740338276af563bf1c0c5ee6
3. Config
An app’s config is everything likely to vary between deploys (staging, production, developer environments, etc) which are credentials to external services such as Database(MySQL, Redis), Cloud Providers or External APIs like Twitter, dropbox, etc.
A beginner might hardcode such config in a codebase or might create separate versions of such file for each deployment. Such a person might not be aware of problems that can arise because of this. If such configs get into the wrong hands (hacker or fresher), that person can bring down the whole system by deleting the database or misconfiguring something accidentally or purposely.
Configs should never be committed to VCS even if it is a private repository. A litmus test for whether an app has all config correctly factored out of the code is whether the codebase could be made open source at any moment, without compromising any credentials.
Some teams maintain a config file with defaults and edit this file manually at the server level according to environment needs. This is a good approach but there is still room for errors.
Another approach is to batch config into named groups (often called “environments”) named after specific deploys, such as the development, test, and production environments. This method does not scale cleanly: as more deploys of the app are created, new environment names are necessary, such as staging or QA. As the project grows further, developers may add their special environments like joes-staging, resulting in a combinatorial explosion of config which makes managing deploys of the app very brittle.
The best way is to make use of environment variables which are provided by every OS out there. In NodeJS, you can access these environment variables using process.env.ENV_VARIABLE where ENV_VARIABLE can be any variable name. dotenv is a popular package to simplify using environment variables which is used by almost every nodejs project out there. From Node v20.6.0, support for reading environment variables from .env file is added which removes the dependency from dotenv package.
We can choose to add this file into .gitignore and pass this file manually across team members or provide a default file for staging and editing this file on sensitive(internet-facing) environments.
Environment variables in NodeJS are accessed from process.env
//index.js

console.log(process.env.foo);
node only supports reading environment variables from files having .env extension
//config.env

foo=bar
add file to .gitignore, as we don't want to commit this file in our git
echo "config.env" >> .gitignore
we need to pass --env-file=config.env for the NodeJS process to read our .env file
node --env-file=config.env index.js
Link to commit for changes in this post https://github.com/sumitbhanushali/bloggo/commit/56c3e46168a9146912db2814cb0030905d3d8300
references: https://nodejs.org/en/blog/release/v20.6.0
4. Backing Services
A backing service is any service the app consumes over the network as part of its normal operation. Examples include data stores (such as MySQL or MongoDB), messaging/queueing systems (such as RabbitMQ or Kafka), and caching systems (such as Redis).
Make your app scalable
If you want your app to be scalable, you should keep components as decoupled as possible. Components like API Servers, Database, Message Brokers, Caching Servers, etc. This way you can independently scale them according to the application's needs. Our API Server should be prepared from the beginning for such changes to come Otherwise, It would take months of refactoring efforts depending on how big your codebase is.
Your App should make no distinction between local and third-party services. Each component must be pluggable where you can attach and detach them at your will. These components can be accessed via URL or some type of credentials which should be stored in the Config. This way, if your business needs require you to swap your local MySQL database instance to one managed by a third-party service such as Amazon RDS, it would just require a change in the URL stored in Config. The same applies to if you need to shard your database or need to replace a faulty database.
In previous posts, we initialized the git repository and did setup for adding dependencies and config. For this post, we require CRUD App Setup, the scope of which is outside of this post hence I have created another post where I have added detailed setup instructions on how to setup Typescript with ExpressJS and Prisma as ORM which will communicate with our database. We will focus on connecting the database using the URL in this post using Prisma. You can checkout the code at commit [https://github.com/sumitbhanushali/bloggo/commit/03792df70faf7182c7ff88c62d9f5426d27627a9] and continue with the below steps
npm install prisma --save-dev
npx prisma init --datasource-provider mysql
This will generate a prisma folder in our root directory where in the schema.prisma file will contain database connection details and Prisma models which will be used to create/update tables in our database. We will add two models in schema.prisma file
model User {
  id        Int      @id @default(autoincrement())
  email     String   @unique
  name      String?
  blogs     Blog[]
  createdAt DateTime @default(now())
  updatedAt DateTime @updatedAt
}

model Blog {
  id        Int      @id @default(autoincrement())
  title     String
  content   String?
  published Boolean  @default(false)
  author    User     @relation(fields: [authorId], references: [id])
  authorId  Int
  createdAt DateTime @default(now())
  updatedAt DateTime @updatedAt
}
This model files are self-explanatory. You can check more about the prisma model here: https://www.prisma.io/docs/reference/api-reference/prisma-schema-reference
The next step is to execute prisma script to run migration which will create these model files inside our database. But before this, we need to setup our MySQL instance
docker pull mysql

docker run -d --name mysqldb -p 3306:3306 -e MYSQL_ROOT_PASSWORD=password -d mysql
This will pull mysql image from docker hub and create container from it, we have set container name as mysqldb and root password as password. Our db will listen on port 3306
docker exec -it mysqldb sh

mysql -u root -p
// enter "password" when prompted

create database bloggo;
This way we can attach to our db container and execute our bash command to connect to MySQL and create a database named "bloggo". type exit to exit from MySQL and container respectively We will update our environment variable to our credentials in config.env file
DATABASE_URL="mysql://root:password@localhost:3306/bloggo"
Next, we will execute prisma script to run migrations, this command also generates prisma client files which comes in handy when using ORM
npx prisma migrate dev --name init
You can now check that tables have been connected by connecting to MySQL instance. Run these commands after connecting to MySQL instance
use bloggo;
show tables;

describe Blog;
describe User;
Now we can use ORM to perform CRUD operations on our database. Let's update our route files to use prisma client to run operations.
// user.route.ts

import { PrismaClient } from '@prisma/client';
const prisma = new PrismaClient();

router.get('/', async (req: Request, res: Response) => {
    const users = await prisma.user.findMany();
    res.send(users);
});

router.get('/:id', async (req: Request, res: Response) => {
    const user = await prisma.user.findUnique({
        where: {
            id: parseInt(req.params.id),
        },
    })

    res.send(user);
});

router.post('/', async (req: Request, res: Response) => {
    const user = await prisma.user.create({
        data: req.body
    })

    res.send(user);
});

router.delete('/:id', async (req: Request, res: Response) => {
    await prisma.user.delete({
        where: {
            id: parseInt(req.params.id),
        },
    })
    res.send(`User with id: ${req.params.id} deleted`);
});
//blog.route.ts

import { PrismaClient } from '@prisma/client';
const prisma = new PrismaClient();

router.get('/', async (req: Request, res: Response) => {
    const blogs = await prisma.blog.findMany();
    res.send(blogs);
});

router.get('/:id', async (req: Request, res: Response) => {
    const blog = await prisma.blog.findUnique({
        where: {
            id: parseInt(req.params.id),
        },
    })

    res.send(blog);
});

router.post('/', async (req: Request, res: Response) => {
    const createdBlog = await prisma.blog.create({ data: req.body });
    res.send(createdBlog);
});

router.delete('/:id', async (req: Request, res: Response) => {
    await prisma.blog.delete({
        where: {
            id: parseInt(req.params.id),
        },
    })
    res.send(`Blog with id: ${req.params.id} deleted`);
});
Now, we can create a user and its blog using our favorite tool like Postman. Curl of which is given below
// First we create a dummy user
curl --location 'localhost:3000/user' \
--header 'Content-Type: application/json' \
--data '{
    "email": "abc@test.com"
}'

// Then blog from userId returned from previous command. In this case, authorId 1
curl --location 'localhost:3000/blog' \
--header 'Content-Type: application/json' \
--data '{
    "title": "Title",
    "content": "Content",
    "authorId": 1
}'
Link to commit for changes in this post https://github.com/sumitbhanushali/bloggo/commit/a91c1424aa8a7279740338276af563bf1c0c5ee6
Up Next
This is where our Part 1 ends. We have learned about VCS like git and how it can make a developer's life a lot simpler, about dependency declaration manifest and how it can make setting up a project smoother, about storing config in env vars which makes deployment secure and the benefits of using backing services as pluggable resources.
In the next part, we will continue with the next 4 steps i.e. 5. Build, Setup and Run, 6. Processes, 7. Port Binding, 8. Concurrency according to 12 Factor App's methodology